Showing posts with label quick supper. Show all posts

Thursday, 30 April 2015

Dinners from north and south (India)


Continuing the theme of accidentally vegan food, here are some other Indian dishes that I cooked during my vegan month. As I utilised a range of ready-made elements these were actually speedy enough to prepare quickly after work too. Firstly from the south of India, the classic masala dosa, and also the classic Gits dosa mix. It's going to be very hard to replicate a proper paper thin dosa at home, but actually the Git's mixes work pretty well even if my dosas were a little on the thick side. I cooked quick potato filling to go in them, as well as a green beans thoran.

I basically used this recipe for the beans, which proved to be excellent; fresh and crunchy, beans and coconut are an excellent combination. The potato masala was a simple mix of a medium potato, carrot, onions and peas with some added flavourings. Firstly fry a couple of teaspoons of mustard seeds in some hot oil until they start popping, and then fling in a small handful of curry leaves, around a tablespoon of ginger paste, a medium chopped potato, a small chopped onion, and a generous sprinkling of salt. Turn the heat down, put a lid on and leave until the potato is virtually cooked through. You can also add a little water if things are starting to stick. Then put a couple of handfuls of frozen peas in, and put the lid back on. Once the peas and potato are fully cooked, add a small handful of roasted cashew nuts, and give everything a good mix. Once the vegetables are done, I made up the dosa mix and cooked these in a non-stick pan. You'll definitely need to work quickly to spread the mix to get it as thin as possible, but even if they are bit on the thick side, they are still very tasty.


Moving further north, I utilised some ready-made Shana parathas to go with my soya mince keema. I always tend to have a packet of these in the freezer as they are very handy for emergency dinners, and on further investigation I also discovered that they are vegan (huzzah). Soy mince, like Quorn, is pretty flavourless so you need to be very generous with your other flavours. For this keema I fried two red, sliced onions in a couple of tablespoons of plain oil, with a couple of bay leaves, a stick of cinnamon, and two cardamom pods. Once the onion was softened and slightly browned, I added 2 tablespoons of garlic/ginger paste, a heaped teaspoon of chilli flakes, and good sprinkling of salt. This was all cooked over a medium heat, until the onions were nicely browned. At this point I added 3 teaspoons of garam masala, and 1 teaspoon each of ground coriander and ground cumin. After allowing the spices to fry for a bit, I tipped in around 300g of vegan soy mince. Once everything was well mixed and heated through (around 10 minutes), a couple of handfuls of frozen peas went in, and I left everything to simmer gently until they were cooked through. You should end up with a dry and spicy keema, which can be neatly scooped up by some hot off the pan parathas.

So there you have it, two pretty speedy dinners, which are full of flavour and spice and just happen to be vegan.

Thursday, 24 July 2014

Going vegan- week 2

I'm back with my update on week 2! You can say one thing for veganism- it certainly aids regular blog posting.

I've carried on with many things from week 1. I'm still eating my Bircher-style muesli for work-day breakfasts, and coconut yoghurt at the weekend. I'm still taking some form of salad type stuff in for lunch, but this time with homemade caramelised onion hummus and some genuinely tasty Ryvita crispbreads (the multigrain one). And I'm eating more Linda McCartney sausages than expected.

There have been some interesting food developments though. After a couple of false starts, I think I've finally found an acceptable soy yoghurt. Unfortunately, I can't seem to locate any plain coconut yoghurt (my preferred option) around here and the (delicious) raw chocolate ones from CoYo are just too much like pudding for me to take into work for a mid-afternoon snack. I tried the Tesco Free From soy natural yoghurt in week 1 but it was pretty horrible- a weird chalky taste, and a smell of slaked clay that reminded me of those mud mask sachets I used to apply as a teenager. It was verging on inedible for me, even when I tried it with lots of chopped up fruit and vanilla extract. I'm sad to say I had to chuck this. Next up was an Alpro vanilla soy yoghurt, initially purchased as there was no plain one available in Tesco. Thankfully this was heaps better. Still a very slight chalky after-taste, but nothing terrible and lots of vanilla flavour. In many ways this was more like a vanilla custard, which is probably due to the amount of added sugar in it. I don't want a load of glucose-fructose syrup in my yoghurt though, so was relieved to finally track down some plain soy yoghurt from Alpro. This was not exactly delicious but had minimal chalkiness, so was acceptable with fruit.

I've also tried three vegan 'cheeses'. The soya-free Cheezly brand one was vaguely ok-ish when crumbled over my hot chilli in week 1. Although it doesn't melt, it tasted faintly savoury, like a sort of homeopathic feta. I tried to add it to my lunchtime salads too, but it's far less successful cold. It was just about edible but not that pleasant. I also tried the Tesco Free From strong soya cheese. This was more cheese-like in texture, and looked a bit like (cheap) Cheddar. But I'm afraid that it just didn't work for me in terms of taste or texture, and I could only eat a tiny bite of it. I'm not even sure why, as it wasn't that unpleasant, but I was immediately sure that that tiny bite would be enough. I still have it in the fridge though, and now a few days have passed I'm wondering if I should try cooking with it. But I don't want to ruin a perfectly nice dinner with the cheese of instant aversion. We shall see. I have fared much better with a Free From garlic and herb soft cheese-style soya spread from Tesco (also soy based). The texture of this was much more like cream cheese, and the strong flavourings meant that pretty much all you could taste was herbiness. Not amazing, but nice enough to go on a Ryvita.


Dinners have continued to be rather successful. I sautéed butternut squash with garlic and za'atar, and made a cheese-free rocket and basil pesto to go over steamed broccoli, which was served with tofu one night and Linda McCartney sausages the next. I also made some frickin excellent lentil and mushroom burgers, which I ate with sweet potato fries, and a big green salad. The burgers were inspired by this recipe from food enthusiast and vegan, ultra-marathon runner Scott Jurek. I changed quite a few things due to an ingredient deficiency and not quite reading the recipe properly, so my version is below, but these were genuinely fab and I will be making them again.


Lentil and mushroom burgers (makes around 6-8 depending on size):

390g tin of green lentils (I used one from Tesco)
Around 100g chestnut mushrooms
3 medium spring onions
3 cloves of garlic
1 tsp mixed dried herbs
0.5 tsp paprika
0.5 tsp ground black pepper
2 tsp English mustard
1 tblsp gram (chickpea) flour
Around 1 tblsp chopped hazelnuts
Around 100g quinoa cooked in Marigold vegetable bouillon stock (and cooled)
Plain oil for frying

So firstly, I didn't have things like ground flaxseed and nutritional yeast which the Jurker uses in his recipe. I subbed those and the breadcrumbs for quinoa and Marigold stock powder. I find this quite salty too, so didn't bother adding any more to the mix. I also didn't read the bit about cooking the vegetables first. So I basically put everything above, except the nuts and quinoa, in the food processor and pulsed and until it had a suitably coarse burger-like texture. I then added the other ingredients put it all in the fridge overnight. The mixture turned out to be a little on the wet-side but not too sloppy. When it came to dinner time, I heated up a thin layer of oil in a non-stick frying pan, took a heaped tablespoon of the burger mix and plopped into the pan, using the back of the spoon to push it down and shape it a bit. These needed around 3-4 minutes on each side to form a crust and colour up. They were just about robust enough to be flipped over and later manoeuvred onto a plate. I'm pretty sure that a lot of moisture was coming from the raw mushroom, so I will definitely cook these first next time, and that should make the patties a lot more robust. But nevertheless, these burgers tasted damn good. Lentil and mushroom immediately summons up some sort of stupid hippy, dippy cliché, but these were properly packed full of flavour and had a great succulent texture. I did think that a bit of melted cheese over the top would be an excellent addition, but obviously that's not very vegan, so some grilled onions and tomato ketchup were a very acceptable substitute. The burgers would be great in a bun with green leaves, but I kept mine au naturel and ate them with some sweet potato fries and a big salad.

The weekend involved polishing off lots of the above as leftovers, snacking on salted crisps, crackers with peanut butter, a variety of raw and roasted nuts, and moderate quantities of dark chocolate. As it was so flipping hot (and humid), dinners minimised cooking and were mostly salad based. On the left is a romaine lettuce, fennel, raddish, carrot, spring onion, artichoke heart, and yellow pepper salad, with a side of beetroot, the now ubiquitous Linda McCartney sausages (rosemary and red onion this time) and a stuffed mushroom courtesy of Sainsburys (a rare cheese-free pre-prepared item vegetarian item).

I also managed a visit to the Gog Magog cafe during the week. My concerns that I'd have to sit in a corner with a black tea, while everyone one else had coffee and cake were unfounded as obtaining a soy milk latte was totally non-problematic, and there was even a vegan cake offering in the form of a damn good date flapjack. Huzzah! And now onwards to week 3!


Tuesday, 1 April 2014

Kalo jeera diye mach or Bengali-style salmon with black onion seeds


This is a really simple salmon recipe that my parents came up with aeons ago for cooking what was at the time a pretty unfamiliar British fish- so a true fusion dish! I'm sure it could be adapted for use with other oily fish, or indeed the more traditional Bengali rui mach. There isn't much jhol, or gravy, as such but what you do have is quite a delicately spiced dish which really compliments the rich flavour of salmon.

Recipe (enough for 2)

Around 300g of salmon, scaled and cut into large-ish chunks
A large thumb-sized piece of ginger, squashed to a paste
2 cloves of garlic, squashed to a paste
1 large dried bay leaf
1 whole green chilli, pricked a few times
Around 2 tsp black onion seeds (a.k.a. nigella, kalonji, or kalo jeera if you're Bengali)
Around 1.5 tsp turmeric
A small squirt of tomato purée
Around 1 tsp salt, or to taste
Around 1 tblsp plain oil
Couple of tbslp chopped fresh coriander leaves (optional)

Firstly marinate the fish in around 1 tsp of turmeric. Give it a good stir so it's all lightly coated, and leave it for around 30mins (or less if that's more convenient). In the meantime squish the the ginger and garlic, and mix into a paste. When you're ready to cook, heat the oil in a suitable pan (non-stick is pretty handy for this) and then put in the fish. Gently fry for a few minutes on each side to 'seal' it but not cook it fully. Take the fish out (leaving the oil in the pan) and put it the bay leaf, ginger and garlic, and chilli. Cook over a medium heat for a few minutes and then add the black onion seeds, and continue to cook. After another couple of minutes, put the fish back in, sprinkle over the rest of the turmeric, and add the tomato purée with a couple of tablespoons of water. Gently mix everything together, season to taste and place over a low heat until the fish is cooked through. This will probably take 5 to 10 minutes depending on the size of your fish pieces.


Once cooked, take off the heat and stir in the coriander if you're using it. Serve with plain boiled rice, and maybe some vegetables, while contemplating the the brilliance of kalo jeera.

Tuesday, 19 November 2013

Courgette carbonara


I spotted several recipes for making 'spaghetti' with courgettes ages ago, but put them out of my mind due to the loss of my 'julienne-ing' device (basically a potato peeler but with a segmented blade). But when it miraculously reappeared in the drawer from which it had previously vanished, I took it as a sign. Of course courgette spaghetti is nothing like proper pasta, but it can be cut into long strips and doesn't fall apart once cooked. It's therefore ideal for gluten-free-ers, or anyone wanting a lighter alternative to a proper carbonara.
I don't eat meat, so actually I've never had a 'proper' carbonara, but this is my completely inauthentic pescatarian version.

Recipe (enough for two with leftovers):

3 medium courgettes
2-3 tblsp olive oil
1 egg yolk
Around 200g chestnut mushrooms, thickly sliced
1 50g tin anchovies in olive oil
3 large cloves of garlic, crushed
300ml creme fraiche
Around 100g finely grated Parmesan cheese
Salt and pepper to taste

Firstly use the most appropriate instrument you have to hand eg food processor, sharp knife, julienne peeler, to make your courgette spaghetti. Dress the courgettes with a couple of spoons of olive oil to stop any discolouration, and put to one side. Mix the egg yolk thoroughly with the creme fraiche, and most of the cheese, and add plenty of black pepper and a little salt. Make sure you have your garlic and mushrooms, prepped and ready to go. Firstly cook the courgettes a little- put a tablespoon or so of oil in a large pan (non-stick works well for this) over a medium heat. When the oil is hot, but not smoking, add in the courgettes and cook for around 5 minutes. The courgettes should have softened but not be fully cooked through. Tip them out into a bowl and put the pan back on the heat. Next add the anchovies and all their oil into the pan, cook over a medium heat until the anchovies start breaking up, and then put in the garlic and mushrooms. Cook over a high-ish heat so that the mushrooms fry and take on some colour. Once they've done this, add the courgettes back in and continue to heat over a medium-high flame until they are cooked to your liking (they should hold together and not turn to pulp). When cooked, turn off the heat and stir in the creme fraiche mix. The residual heat from the pan should loosen this thick mixture, and coat the courgette strands. And that's it! Have a taste and add more salt and pepper if  needed, and then serve with a little extra Parmesan on the top.

You can make this dish properly vegetarian by omitting the anchovies, and using something like chopped fresh basil or thyme, or some dried herbs instead; and by using a veggie-friendly Italian-style hard cheese.

This would make a great non-stodgy summer dish, when there is often a glut of courgettes about. But I ate it last week in November, whilst wearing a jumper, and that seemed to work fine too.

Monday, 12 November 2012

Paneer korma


I cook a fair amount of Indian food, but have yet to find a way to photograph most of it in a way that makes it look terribly appetising. Thus the above picture, that shows something vaguely yellow in a gloopy sauce. But don't let that put you off, as this Shahi-style paneer korma is really rather delicious and quite quick to make.
Shahi-style Indian food usually uses ground nuts and cream, so is pretty indulgent, but as the nights draw in I feel that a little indulgence is no bad thing. So here's my version of some classic Indian comfort food.

Recipe (enough for 2 as a main course):

One block of paneer (c.250g)
1 small onion
A thumb-sized piece of ginger
2 cloves garlic
1 dried bay leaf
0.5 tsp chilli flakes
1 tsp tumeric
1 tsp ground corriander
1 tsp ground cumin
1 tsp garam masala
0.5 tsp salt (or enough to season)
0.5 tblsp tomato purée
1-2 tblsp ground almonds
Around 50ml double cream
1-2 tblsp plain oil
A few tbslp of water, if needed

Firstly chop up the paneer into small-ish cubes, and sprinkle over the turmeric until the paneer is reasonably well coated. Heat the oil in a flat bottomed pan, and when it's hot carefully place the paneer and any extra turmeric in. Cook the paneer for a few minutes on each side until it's lightly browned and golden, with a bit of a 'crust'. When it's done, take the paneer out and set to one side. Make a paste from the onion, ginger and garlic (by mechanical means for convenience). The smoother it is the smoother your finished sauce will be, but as you can see from the photo above it's not essential. Fry the paste in the remaining oil in the pan for a few minutes, along with the bay leaf and chilli. If the pan is too dry, add a little extra oil. Put in all the ground spices, and carry on cooking for a few more minutes before adding the ground almonds. Once these are lightly toasted, put in the tomato purée  and if needed pour in a little water to create a thick paste. Once everything has been heated through for a few more minutes, add the cream and salt to season. Mix well to form a thick sauce, and then put the paneer cubes back in the pan to heat through. You can adjust the thickness of the sauce by adding more cream (or water) if you want too.

Serve with some plain boiled rice and steamed vegetables to balance out the richness of the cheese and cream.

Saturday, 6 October 2012

Broccoli pesto mash

I really like broccoli, it's probably one of the green vegetables that I eat most regularly. The tenderstem stuff is ideal as a simple side dish with butter and salt and pepper, and the big green fists of florets are perfect for everything from stir fries to pakoras. So when I was looking for something green to make a pesto with I thought I'd try some cooked broccoli. And it was really good! You can add this 'pesto' to pasta, or if you keep it thick just have it as a mash. I've had it with some pan-fried salmon instead of mashed potatoes, but it would probably go with most things (apart from pudding). I've included a basic recipe below, but do alter the amounts of things based on taste.

Recipe (enough for two):
Around 250g of broccoli florets
1 medium clove garlic
1 big handful pine nuts (lightly toasted if preferred)
Around 50g hard Italian cheese such as parmesan, grana padano, percorino or a properly veggie substitute
Around 1-2 tblsp extra virgin olive oil
Salt and pepper to taste

Cook the broccoli in boiling water for around 8-10 minutes. You want it to be fully cooked through, and probably a bit softer than if you were just eating it on its own (but not boiled to a deathly grey). Drain, and put it and all the other ingredients apart from the oil into a food processor, and whizz together. I have a small Kenwood mini-chopper and make this pesto in two batches, mixing it all together afterwards. Once the pesto ingredients are all combined, but not totally pulverised, add some oil. If you want a loose pesto to go on pasta be generous with the olive oil, but for the mash just use a tablespoon or so to bring it all together. Add some salt and pepper and you're good to go. This process is a bit more complicated without mechanical assistance, but you could probably still crush the garlic, nuts and cheese in a pestle and mortar, mash the broccoli separately and then combine the two together.

I've made this, and allowed it to cool, before it mixing it with hot pasta for dinner. And had it hot straight after being blitzed too. Broccoli is indeed the king of versatility.

Tuesday, 10 July 2012

Mushrooms stuffed with scallops


I came up with this dish the other day after randomly seeing a man cooking some of those little queen scallops on Countryfile (my Sunday television viewing is of the non-challenging variety). And having made Ottolenghi's stuffed mushrooms quite recently, I thought that I'd try and add some elements from that recipe too. Cheese and seafood is a bit of a contentious combination, but I thought that the mild, milkiness of Taleggio cheese went really well with both the mushroom base and the scallop filling. I served these mushrooms with some steamed broccoli and braised fennel. And though I was bit concerned that this wasn't going to be enough for dinner it actually was, with quite a small tub of queen scallops stretching to a dinner for two.

Recipe (enough for two):

4 large field mushrooms
3 medium spring onions, sliced
1 clove of garlic, chopped
Around 160g of queen scallops 
Light sprinkling of dried basil or 1tsp of freshly chopped basil leaves
1 tblsp double cream
Salt and pepper to season
Around 200g Taleggio cheese
A few tblsp olive oil

Remove the stalks from the mushrooms, chop them up quite finely, and put to one side. Heat a frying pan with a few tablespoons of olive oil and gently fry the four whole mushrooms until they are cooked through. This should take around 10minutes, but will depend on how large the mushrooms are. Once cooked, take the mushrooms out, and add a bit more oil. Gently fry the spring onions, mushroom stalks, and herbs. Once they've softened, increase the heat a bit, and add in the scallops and garlic. Cook for a few more minutes, season with salt and pepper and then take off the heat. Stir in the cream to bring everything together in a sort of sauce. Next, slice up the Taleggio, spoon the scallop mix into the mushrooms, and top with the cheese. You might not need all the cheese, but it's nice to be generous with it, so try and make sure all of the top of the mushrooms are covered. 
Put the mushrooms under a hot grill for around 5minutes, until the cheese is melted and bubbling on top. Serve with some vegetables for a pretty speedy supper, while wondering if this might be the first Countryfile-Ottolenghi recipe mash-up.


Monday, 13 February 2012

Bengali-style egg curry or dim er torkari

So here's some real Indian home-style cooking, which is perfectly suited to the recent chilly weather we've been having. This curry is one of my mother's original speedy dinner dishes that I've been eating for several decades now, and is essentially made with store cupboard ingredients. There are versions of this egg curry from all over India, and I'm not exactly certain that this one is particularly Bengali. But as the person who cooked it is, that's what I've called it.

The dish basically comprises some hard boiled eggs in a tomato-based gravy, and for me is the epitome of hearty and warming. It is also pretty quick to make, especially if you have you eggs boiled and ready beforehand.

Recipe (enough for four as side dish):

4 hard boiled eggs, shelled and cooled
Around 1 tblsp plain flour
1.5 tsp turmeric
2 tblsp oil
1 medium onion, finely sliced
3 fat cloves of garlic, crushed
1 green chilli, pierces several times with the tip of a knife
Small thumb-sized piece of ginger, crushed to a paste
Around 8 cherry tomatoes, halved
1 tsp tomato puree
A dried bay leaf
0.5 tsp garam masala
1 tsp ground cumin
1 tsp ground coriander
0.5 tsp salt
3-4 tblsp fresh, or frozen and defrosted peas
About half a mug of water

Start by halving the boiled eggs, and lightly dusting them with the plain flour. Heat up a tablespoon or so of the oil (ideally in a non-stick pan) until its hot but not smoking, and carefully place in the egg halves in. Sprinkle over half a teaspoon on the turmeric, and when the eggs are lightly browned on one side turn them over until the other side matches. The turmeric means that the eggs should be golden by this point, and when they are take them out of the oil, and put to one side.
I should say that this 'frying the eggs' stage is optional, but I do find that it adds a slight crispy texture that I really like. But if you can't be bothered then just start with the below.
Put the rest of the oil in the pan and heat, before adding the bay leaf and the onions. Once the onions have started to soften, add all the ground spices including the rest of the turmeric. Stir well and then add the chilli, ginger and garlic. Cook this over a medium heat for a few minutes. Next throw in the tomatoes, and continue to cook until they've softened. Then add the tomato puree and enough water to create a thick gravy. Once it's gently bubbling put the eggs back in, tip in the peas and season with salt. Let this cook for few more minutes until the eggs and peas have heated through.

You can add some cubed, cooked potatoes to this too which makes it more of a main dish, or perhaps increase the number of eggs per person. Otherwise serve with rice and something else (I made a cabbage dish with ginger and cumin which you can just see peaking through in the picture above). Also feel free to adjust the spicing according to taste. I remember this egg curry as quite a mild dish, but if you fancy more of a kick chop up the chilli and fry it with the onions rather than keeping it whole. If you prefer things mild, don't accidentally bite into the whole chilli (I speak from experience).

Monday, 7 November 2011

A speedy seafood stew

I really like things with fish and fresh seafood, but due to the dearth of fishmongers in the area my choice of ingredients is often limited to what is in the supermarket. Those plastic trays of prawns and mixed seafood aren't always the most inspiring thing, but I have realised that they can work very well in dishes like this. It's a vaguely Mediterranean concoction of fennel, olives, garlic and tomatoes, that is very tasty and quick enough to prepare for a post-work dinner.

Recipe (enough for 2 greedy people, with leftovers for the next day)

1 large bulb of fennel, finely sliced
1 small white onion, finely sliced
3 fat cloves of garlic, crushed
1 large sprig of thyme
1 tin chopped tomatoes (400g)
4 medium fresh tomatoes, roughly chopped or 1 heaped tsp tomato puree
Some water
About 15 small-ish green olives
1 tray mixed seafood, including squid and mussels (around 290g)
1 tray cooked king prawns (around 200g)
1/2 tsp chilli flakes
3 or 4 tblsp olive oil, or enough to generous coat the bottom of your cooking pan
Salt and pepper for seasoning

Heat the olive oil in reasonably large pan, and when it's warm put in the onion and fennel. Cook for around 5minutes over a medium-low heat until they've started to soften but not coloured. Then add the garlic, thyme and chilli flakes and cook for a few more minutes. Next, add the fresh tomato (or puree), the tin of tomatoes, and about half a tin's worth of water so that you have a loose tomato sauce. Simmer this on a low heat for about 10mins. At the end of this, the fennel should be tender. Next add the olives, and after another 5mins of simmering put in the cooked seafood. Add enough salt and pepper to season, and let the seafood heat through for a few minutes. Serve while piping hot with some bread.

Tuesday, 28 June 2011

Ottolenghi's black pepper tofu

London restaurateur and general veggie behemoth Yotam Ottolenghi's black pepper tofu recipe rapidly seems to have become a modern classic. It's appeared in the Guardian, on Masterchef, and has also been widely blogged (which is where I came across it some time ago). It's taken me the best part of a year to get round to making it, but the discovery of bags of ready-fried tofu in a local Chinese supermarket prompted me to finally give it a go.

The original Guardian recipe serves four and has a huge amount of chilli and black pepper in it. I have to admit that while I halved the amount of tofu, I more than halved the seasoning as I am a wuss. I also omitted the sugar in the Ottolenghi recipe and only used the one type of soy sauce, so in case you want my amended version here it is.

Recipe (easily enough for two):

350-400g ready-fried tofu
75g butter
6 shallots (finely sliced)
2 hot red chillies (seeds left in, and finely chopped)
Around 1.5tblsp ginger (crushed to a paste)
6 cloves of garlic (crushed)
Around 2 tblsp black peppercorns (crushed)
Around 5 tblsp good quality soy sauce (such as Kikkoman)
8 spring onions (each chopped into about 3 or 4 pieces)

Melt the butter in a wok or deep frying pan over a medium heat, and then add in the shallots, garlic, ginger and chilli. Once these are soft and a bit golden (around 10 to 15 minutes) add in the fried tofu, black pepper and soy sauce and stir everything around to heat up the tofu. Finally put in the bits of spring onion, stir and cook until these are just soft, and you're done.
I served this with some steamed green vegetables, dressed with a little sesame oil, but plain boiled rice would also be fab.

Do note that even with my slightly reduced amounts of pepper and chilli, this is still a bloody fiery recipe. It's incredibly tasty but my lips were tingling a good thirty minutes after we'd finished eating. But I think most of the heat is from the pepper rather than the chilli, so you do get a lot of flavour too, rather than just chilli burn. And that's what makes this such a top dish.
So a great quick dinner recipe (especially if using ready-fried tofu) and one that definitely combats the tofu is dull and boring brigade.

Wednesday, 4 May 2011

Home-made pizza success

The idea of making my own pizza from scratch never occurred to me until quite recently. I'm not really sure why, but it probably relates to my fear (and poor track record) of making things involving yeast. However this recipe by Deepa on her Lazy Giraffe blog looked both pretty simple and very delicious. I followed Deepa's recipe exactly for the base, but had to omit the broccoli from the topping as I didn't have any. However the pizza turned out really well with just the garlic, creme fraiche, mozzarella and a sprinkling of herbs in a bianco style. As you can see from the picture, I had some oozing over the side issues so the lesson for next time is not to over-do things with the topping, but apart from that this pizza was amazingly good! Fully cooked through, light in the centre with a crisp crust, plenty of melting cheese, and authentic 'air pockets' (or whatever the technical term is).

I used more of the dough to make an alternative version with some bought sun-dried tomato pesto, more mozzarella cheese and some thinly sliced red onion- which was also fab.

Here are a few extra things I discovered while making this pizza:
i) I ended up with quite a lot of liquid leftover from the initial recipe so just chucked in some extra flour and made more dough. I split this into individual portions and put it in the freezer (in some well oiled freezer bags). I defrosted the dough in the fridge overnight when I wanted to use it, and it the next day it was perfect to roll out . Thanks to Deepa for this tip.
ii) I found this dough quite sticky, so you'll need a well floured board and hands to roll it out.
iii) I didn't heat up the tray the pizza went on, but did pre-heat my gas oven on the highest setting for about twenty minutes and put the tray on the highest shelf in there. The pizza took around 10-15minutes to cook.

So in conclusion, there are times when you wonder if it's worth making something at home that you can easily buy in the shops, but in this case it is definitely worth it. The recipe is simple enough to make as a quick post-work dinner (even with the proving time), and you can choose whatever you want as a topping- bonus!

Thursday, 24 February 2011

Ohn-no khao swè AKA Burmese coconut noodles from Meemalee's Kitchen

I've been meaning to make these Burmese noodles for ages now, ever since seeing it on MiMi's excellent Meemalee's Kitchen blog last year. The full recipe can be found here but as ever I adapted things a bit.
Instead of chicken I used ready-prepared deep fried tofu, and added some chilli flakes to the ginger/onion/garlic paste it's cooked with. And due to laziness I bought some chilli oil and used prawn crackers for the garnish (rather than deep fried rice stick noodles as MiMi instructs). I also forgot to add the thinly sliced shallots and lime before eating, but this can be entirely attributed to rushing to scoff my lovely smelling bowl of food. I hope MiMi forgives these dips in authenticity, but even so this was a totally delicious dish.
The noodles in their coconut broth were rich but not heavy, and the tofu provided a good contrast in texture. It was all lightly spiced but very flavourful, despite missing the garnishes which I suspect would have provided a touch of freshness too. This was also a really simple and straightforward meal to prepare and could easily be an after-work dinner.
I heartily recommend it, and will definitely be making it again- this time with full garnish compliance!

Thursday, 9 December 2010

Calcutta-style egg rolls

As my family is from the West Bengal region of India (state capital Calcutta/Kolkata) this is an area I've visited a few times over the course of many years. Calcutta is pretty famous for its street food- not that I'd know much about that though as my parents concerns for the often less than sanitary conditions in which street stalls operate limited our consumption of these delights. However there were a few times when the hygiene police relaxed their (probably sensible) policy and a few treats sneaked through. The one I remember most vividly are egg rolls- a sort of thin, flat bread, with an omlette layer attached to it, with lots of chilli and red onions. This was all rolled up, wrapped in greaseproof paper and eaten hot off the griddle. They must have been good as the last time I had one was about twenty years ago and I still remember them.
The bread element is very light and stretchy, and I've no idea how it's made. But the closest thing I've found to it are the Shana parathas I've blogged about recently. So for a super-speedy egg roll supper all you'll need are:

Recipe (enough for one hungry person)
2 ready make parathas such as the Shana brand
2 eggs
1 small red onion, finely sliced
1 medium green chilli, finely sliced with seeds removed if you prefer things mild
Salt and pepper to season
Couple of teaspoons of sunflower oil or similar

First cook the parathas fully and set aside. Beat the eggs well, season, and stir in the onion and chilli. Put a teaspoon or so of oil into a frying pan and heat it as much as you would if making an omlette. Once hot enough, pour in half the egg mix and wait about 10 seconds until it starts to set. While it's still liquid on top, push the paratha into the egg until the heat 'fuses' them. Turn the heat down, and then once the egg layer is cooked, flip the paratha so that the bread layer warms up and any overspill egg is cooked through as well. Repeat with the second paratha and the rest of the beaten egg. Roll up with the egg layer inside, and and scoff while hot. Eat with some salad if you are so inclined.

NB I'm sure that the egg rolls I ate had the onion and chilli cooked with the egg, but you can also not bother cooking them and just put them in at the rolling up stage (apparently).

Monday, 15 November 2010

Shana parathas and jeera aloo (cumin potatoes)

I love Indian breads in all their forms- makhani roti, batura, luchi, poori, naan, parathas, yum, yum, yum. I also love the potato in all its forms- baked, chipped, mash, roasted and boiled, being some of my favourites. And so despite the risk of carb-overdose, the combination of parathas and potatoes is one of my favourites.

It is however a bit of a pain to come home and start making parathas after a hard day at the office. In fact kudos to the Indian housewife because it is quite difficult to do well even if you haven't been sweating over a powerpoint presentation all day. Luckily I discovered Shana frozen parathas a few years ago. And therefore instead of lots of dough forming, oiling, and clever folding and rolling, I usually open a packet of these and cook them for a few minutes on a tava or non-stick frying pan. And to go with my flaky flatbread I like a generous helping of some jeera aloo (potatoes cooked with cumin) and a little red onion and cucumber salad.

Recipe (enough for 2)

About ten or twelve small potatoes such as Charlottes, choppped into smallish pieces
1 tbsp flavourless oil such as sunflower
1.5 tsp ground cumin
2 cloves of garlic, crushed
1 tsp ground chilli, or one whole chopped green chilli
Salt and pepper for seasoning

Heat the oil in a karahi, wok or deep frying pan. When it's quite hot but not smoking, add in the potato, and cook on a medium heat. After a few minutes put in the cumin and chilli, mix well and reduce the heat a bit. The potatoes will take around 10 to 15 minutes to cook through, and become golden brown with a sort of cumin crust. When they're almost done add the crushed garlic, season well, and leave on a low heat until the potatoes are fully cooked.
While the potatoes are cooking, chop some red onion and cucumber for the salad, and heat the frozen parathas. Scoff while everything is still piping hot, and add extra chillis or pickle if required. NB Serving on a stainless steel thali for authenticity is not essential.

Shana paratha (original)
I rate them 8/10
Cost: Around £1.80 for a packet of 5

Saturday, 2 October 2010

Jamie Oliver's spinach and ricotta tortelloni

As I've probably said before fresh pasta parcels are often a default dinner for me. They're quick and easy but do sometimes suffer from a flavour fail. I quite liked these Sainsbury Taste the Difference ones, but they weren't exactly setting the world on fire. Enter Jamie Oliver. He's now put his name (and indeed face) to a range of fresh, handmade pastas which I spotted recently in Tesco. I thought I'd try the traditional sounding spinach and ricotta tortelloni, as it's a classic combination that it's hard to go wrong with but can be quite dull.
The first thing I noticed was that these tortelloni were huge- almost the size of my fist. And there weren't very many of them- this concerned me. However on closer inspection the pack was the same weight as other similar products. I think I prefer having a greater number of smaller things rather than a couple of giant items on my plate. But that's just me.

So anyway, how did my dozen or so tortelloni taste? Well actually pretty good. I just dressed them with some olive oil and black pepper, and the flavour of spinach and nutmeg came through pretty well. The cheese filling tasted much stronger than just ricotta though, and on examination of the ingredients, Edam cheese made an unexpected appearance. I suspect there are some Italian nonnas spinning in their graves, but it was tasty and added a bit of density to the filling that I quite liked. The pasta itself was relatively light and not too claggy, so all in all quite enjoyable and certainly good enough to be a quick post-work dinner.

Jamie Oliver Spinach and Ricotta Tortelloni
I rate it 7.5/10

Cost: Around £3.50 (possibly just about enough for two if not starving)

Monday, 2 August 2010

Piedmont stuffed peppers

I'm pretty neutral about Delia Smith, but it has to be said that she has come up trumps with various recipes that have featured on this blog such as the rhubarb crumble ice cream and profiteroles. There was a sort of retrospective of her 'work' on television a while ago, and it reminded me of a recipe from her Summer Collection book that I always meant to try but never got round to making. As Delia herself says this is not an original recipe but one that was popularised by Elizabeth David. Delia's recipe uses regular bell peppers but I'd really recommend using those sweet, pointy peppers instead. Having tried it with both, the regular peppers were a bit watery and lacking in flavour compared to their pointy brethren.
So to make these Piedmont peppers, just cut them in half length-ways and scoop out any seeds or white pith. Place on a baking tray and put a couple of chopped anchovy fillets, a few slices of garlic, and some halved cherry tomatoes inside each pepper. Season with a little pepper, and drizzle a couple of teaspoons of olive oil (I use the oil the anchovies came in) over each piece of pepper.
Bake in a moderate oven (gas mark 5) for around 45mins or until the peppers are soft and collapsing. These peppers are so quick to prepare they make a great side dish, and could probably be made entirely vegetarian with the substitution of the anchovy with a suitable salty cheese. I served these with some roasted sweet potato and grilled tuna, and it made a great summer dinner. Ideally eaten while pretending to be a Piedmontese peasant.

Sunday, 13 June 2010

Spaghetti with broccoli, anchovy and walnuts


Broccoli dressed with anchovy is a pretty classic combination, as is pasta with garlic and anchovies- so I thought I'd combine the two into a very quick and simple dinner. The addition of the walnuts adds a slightly sweet and well, nutty, contrast to the saltiness of the fish and just seems to work very well. This is also quite a light pasta dish and so ideal for long, hot summer days (of which we've currently had two).

Recipe (enough for one)

3 large broccoli florets
4 anchovy fillets, roughly chopped
2 cloves garlic, crushed
6-8 walnuts, roughly chopped
Enough spaghetti for one, around 100g
Salt and pepper to season
Olive oil

Thinly slice the broccoli florets and gently cook in a couple of tablespoons of olive oil for around five minutes. When it's almost tender, increase the heat and add the anchovies and garlic. As the anchovies break up, drop in the walnuts and continue to cook for a couple more minutes until the garlic and broccoli are fully cooked. Cook the pasta, and mix in with the broccoli with a spoonful or two of the pasta water to loosen it all up. Season with salt (although you may not need any so taste first) and pepper, and it's done.
Ideally eat al fresco, or else staring out of the window at the rain.

Thursday, 6 May 2010

Salmon salad nicoise

I was intending to write this post a couple of weeks ago. I was wearing sandals, wandering around in a floaty skirt, and keen on moving on from hearty winter fare to something a little lighter for my dinners. However summer seems to finished now, and I am back to being wrapped in a scarf. Humph.
Anyway, this is one of my favourite quick summer meals. A traditional tuna nicoise salad combines tinned tuna with boiled potatoes, salad leaves, tomato, green beans, boiled egg, anchovies and olives. This version replaces the tinned fish with some freshly grilled salmon fillets, and I've previously used fresh tuna steaks too. I omitted the tomato (realised I didn't have any) and olives (thought the anchovy would add enough saltiness), and added in some finely sliced red onion (for a bit of extra sharpness). This is not one of those recipes that requires precise amounts of ingredients so the below are really only guidelines, and you can also add in the components that I left out if you like them.

Recipe (enough for two):
2 salmon fillets, grilled, skin removed
Around 12 small new potatoes, boiled
2 eggs, boiled until hard or soft, quartered
6 anchovy fillets
1 small red onion, finely sliced
2 generous handfuls of green beans, boiled or steamed until tender
1 bag of mixed salad leaves

Dressing:
Around 6tbsp olive oil
Around 2tbsp lemon juice
Salt and pepper to taste

So simply whisk together the dressing, assemble all the above ingredients, and pour over. I like to eat this while it's still warm with the dressing being absorbed by the potatoes, and their residual heat also slightly softening the onion. But it's perfectly nice at room temperature too. Ideally serve when it's a lovely summer day.

Sunday, 25 April 2010

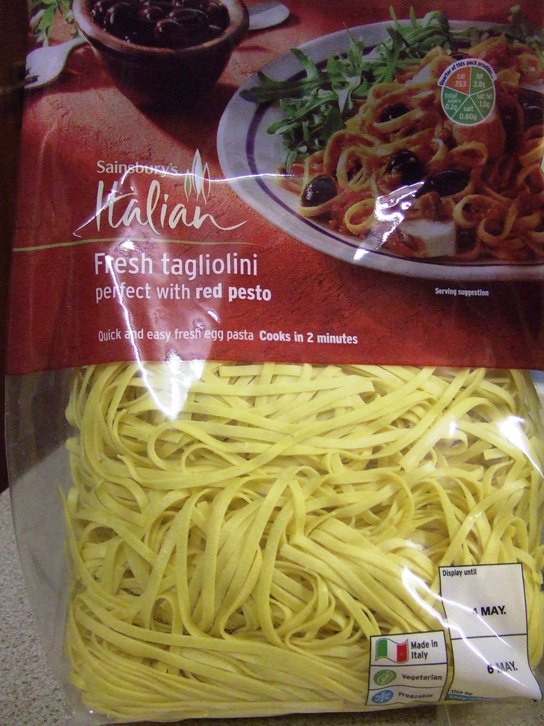
Sainsbury's fresh taglionini with rocket pesto

Shop bought pasta parcels in all shapes and sizes are often my fallback option for a quick dinner. But I think this is pretty much my only experience of fresh non-filled pasta, and I've never thought to buy a fresh alternative to my long lasting packets of dried spaghetti and linguine.
But in the spirit of trying something a bit new I picked up a bag of tagliolini from the refrigerated shelves of Sainsbury the other week. As the name seems to indicate these ribbons are a bit thinner than tagliatelle, and are enriched with egg giving the pasta a lovely yellow tinge. It's also made in Italy which probably helps those concerned with authenticity (surely our Italian brethren wouldn't send over duff pasta?).

It just needs a couple of minutes in boiling water to cook, and I served it with a simple rocket pesto. The pesto was made with this recipe, but substituting two big handfuls of rocket (around 50g) for the basil and also adding in a small chunk of grana padano or Parmesan cheese. The mellow richness of the pasta was a lovely match to the sharper flavours of the pesto. In fact I think I could have made things even simpler, and could quite easily have eaten this pasta with just a little butter or olive oil and salt and pepper.
I've never made my own pasta from scratch, and until I do I think this version from Sainsbury makes a seriously good substitute.

Sainsbury's fresh tagliolini
I rate it 8.5/10
Cost: Around £1.55 for a 500g bag

Saturday, 27 March 2010

Falafel with canellini bean humous

I seem to have had a box of Al Fez falafel mix sitting in my cupboard for the past year or so now. And as spring finally seems to have arrived I thought I'd try move on from hearty winter fare to something (a little) lighter. So falafel and humous with salad it was. The mix just needed cold water adding to it, and shaping into around six small-ish balls before frying (the instructions said to deep fry but I defied them and shallow fried the falafel). This is definitely a quick and easy way to make falafel and is not bad on the taste front either, with a good hit of cumin against an otherwise mild background. I did find the texture a little dense and stodgy though- but this may have been down to my frying choices. I think I'd like to try making my own falafel from scratch to really compare flavours but until then this Al Fez mix is not a bad shortcut.

I was fully intending to make a regular chickpea humous to go with the falafel but due to a previous shopping error found I only had a tin of canellini beans available. This seemed to be an acceptable substitute though, so I tipped the contents of the tin into my trusty Kenwood mini-chopper along with a fat clove of garlic, a heaped teaspoon of tahini, salt and pepper to taste, and a squeeze of lemon juice. The texture of this humous was a lot smoother than one made with chickpeas (and didn't need any olive oil adding to it). And although it lacked the slight nutty taste of regular humous it was still pretty good. A red onion, tomato, and cucumber salad and some warmed pitta bread completed my meal- and it did feel like I had taken a small step towards summer (of course it poured down with rain the next day).

Al Fez Falafel Mix
I rate it 7/10
Cost: Around £1.00