I am not a huge coffee drinker, but my consumption usually rises in the summer when iced coffee starts appearing on the menu of the cafe mega-chains that are so handily placed around our train stations and places of work. Milky coffee poured over ice doesn't sound too complex an item to replicate at home, but there seems to be lots of debate over how to make the coffee element with advocates for instant coffee, cold brewing, and just chucking an espresso over ice.
Anyway, as summer in the UK has finally kicked in over the past few weeks, I thought it must be a sign when I saw this recipe for iced coffee on the Beautiful Mess blog. This basically involves steeping ground coffee overnight in the fridge, filtering, and that's pretty much it. I halved the quantities used, so for 2.8 litres of water I added around 2.5oz of ground coffee (apologies for the mixed measurements resulting from trying to scale down a US recipe), which still makes a lot of iced coffee. I did also try adding a teaspoon of cinnamon, but that wasn't really enough to have any impact on flavour. So I'd either leave this out altogether, or bite the bullet and add the proportions recommended in the original recipe. I like my coffee milky in all circumstances, so for my final drink I filled a glass with ice cubes and poured in about two thirds coffee, a third milk, and a little cream for extra richness. This resulted in an icy cold drink that was also rich and smooth. But obviously making iced coffee at home means you can have it however you want, and add whatever flavourings or syrups you fancy too.
Apparently, the cold brewed coffee should be fine in the fridge for at least a couple of weeks. And so far I've found that the inconvenience of having a large glass jar occupying a big chunk of the fridge, has been well worth the delight of having iced coffee available at all times.
Monday, 5 August 2013
Tuesday, 30 July 2013
Gog Magog Hills Cafe, Cambridge, UK
Things seem to have gone a little quiet on the blogging front here. To be honest, the unexpectedly hot weather over the summer means that I've mainly been sticking to dinners that require minimal cooking, tending to avoid the kitchen unless essential, and eating ice cream at every opportunity.
But the nice weather has also resulted in a couple of visits to the rather lovely Gogmag Hills cafe a.k.a. the Canteen, and I realised that I have not written about it here before.The site consists of a butchers, farm shop, and excellent dedicated cheese shop, as well as the cafe. And with excellent timing, there is also an extended outside seating area too. So it feels a bit like being out in the country, despite only being five minutes from the Addenbrooke's mega-biomedical campus. The cafe does a range of savoury stuff for lunch, including some fab looking scotch eggs and sausage rolls for meat-eaters, and loads of cakes, scones and traybakes.
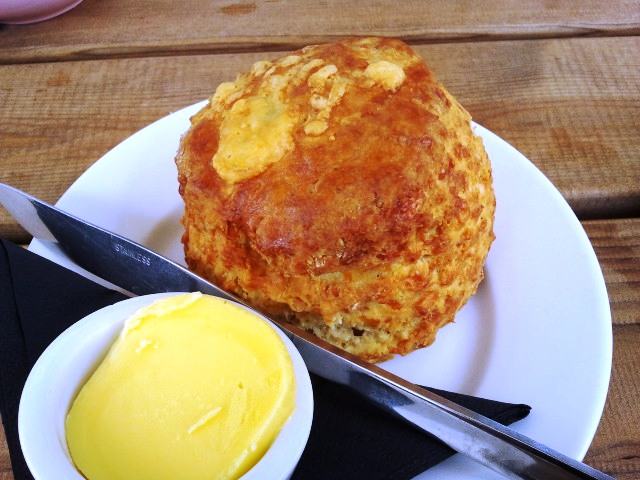
On my recent visits I sampled a fantastic lemon victoria sponge cake that was light, moist, and lemony without being lip-puckeringly so. And a cheese scone with butter made for an excellent lunch. Service at the cafe is always cheery, even when they are busy, and as a notorious tray-wobbler I really value the fact that they bring your order to your table (even if you're sat quite far away outside). As an extra bonus, there is at least one very friendly, non-barky farm dog who politely brings you a ball to throw for her.
To be honest, there's very little not to like about this place and you could easily spend a couple of hours sitting outside admiring the view (and eating cake). I plan to return again while the sun lasts, and probably even if it doesn't.
Gog Magog Hills Farm Shop and Cafe
Heath Farm, Shelford Bottom
Cambridge CB22 3AD
But the nice weather has also resulted in a couple of visits to the rather lovely Gogmag Hills cafe a.k.a. the Canteen, and I realised that I have not written about it here before.The site consists of a butchers, farm shop, and excellent dedicated cheese shop, as well as the cafe. And with excellent timing, there is also an extended outside seating area too. So it feels a bit like being out in the country, despite only being five minutes from the Addenbrooke's mega-biomedical campus. The cafe does a range of savoury stuff for lunch, including some fab looking scotch eggs and sausage rolls for meat-eaters, and loads of cakes, scones and traybakes.
On my recent visits I sampled a fantastic lemon victoria sponge cake that was light, moist, and lemony without being lip-puckeringly so. And a cheese scone with butter made for an excellent lunch. Service at the cafe is always cheery, even when they are busy, and as a notorious tray-wobbler I really value the fact that they bring your order to your table (even if you're sat quite far away outside). As an extra bonus, there is at least one very friendly, non-barky farm dog who politely brings you a ball to throw for her.
To be honest, there's very little not to like about this place and you could easily spend a couple of hours sitting outside admiring the view (and eating cake). I plan to return again while the sun lasts, and probably even if it doesn't.
Gog Magog Hills Farm Shop and Cafe
Heath Farm, Shelford Bottom
Cambridge CB22 3AD
Wednesday, 3 July 2013
Tuesday, 18 June 2013
Parmesan custard and anchovy toast
I first heard of this dish when a tall, medical friend of mine was being very enthusiastic about eating it at Rowley Leigh's Le Cafe Anglais restaurant in London. I meant to look it up then, but never quite got round to it, so it was quite handy when the recipe appeared in last month's Waitrose magazine. Further investigation has revealed that it's actually all over the internet, such as here. The Waitrose recipe goes for the anchovy butter simply spread on toast, rather than made into little toasted sandwiches, but apart from that it's identical.
This recipe was surprisingly easy to make, although it took way longer to cook than the 15 minutes stated. More like 45 minutes I'd say. I have to say that after the waiting around and tentative bain marie shaking, I was a little disappointed that the Parmesan custard wasn't a bit more cheesy. However on reflection, the contrast between the salty, fishy toast and the creamy custard, was very acceptable and more Parmesan would probably have been overwhelming (I am still tempted to make it again with more cheese though). Anyway, I really liked this recipe and particularly the toast part and will definitely be cooking it again in the near future (possibly with extra cheese).
Wednesday, 29 May 2013
Bengali-style cabbage with prawns or badakopi torkari
Right back to a bit more Bengali food now. This cabbage dish is a staple of Bengali cooking, and one I remember being forced to eat when I was small. I would assiduously pick out all the prawns (and eat them), have a tiny bit of cabbage and then declare that I'd 'finished'. I didn't get away with this that often. Happily I am now a big fan of cabbage in all its forms, from Savoy to the white stuff.
Traditionally Bengali vegetable dishes aren't often cooked with garlic or onions, and so this cabbage recipe uses a simple combination of ginger and whole cumin seeds. Adding prawns is optional, and if you want to keep things vegetarian, peas are a good substitute. And in fact, having both in there is fine too.
Recipe (enough for 4 as part of a larger meal):
1 white cabbage, washed and shredded
Large thumb-sized piece of ginger, squashed to a paste
1 dried bay leaf
1 piece of cinnamon/cassia bark
1 green chilli
2 cardamon pods, split
1-2 tsp turmeric
2 tsp whole cumin seeds
1-2 tblsp sunflower (or other plain) oil
Around 150g cooked prawns and/or a couple of handfuls of peas
1 tsp salt, or enough to season
Heat up the oil in a large-ish flat bottomed pan (ideally) and when it's hot, but not smoking, throw in the bay leaf, cinnamon, cardamon. After a minute or two, add in the ginger and cumin seeds, and continue to stir over a medium heat for another couple of minutes. When the ginger is just starting to cook through and the seeds are slightly brown, put the cabbage in and stir everything really well. The residual water from washing the cabbage should provide enough liquid and steam to cook it. Once the cabbage has shrunk down a little, add the turmeric, salt, and green chilli (prick a couple of holes in it with a knife, so you get the flavour but not the heat), and stir well. Cook the cabbage for at least 15 minutes over a low heat with a lid on the pan- it should be completely tender and mildly yellow. Finally put in the prawns or the peas (defrosted if frozen), mix everything together and cook for a further 5 minutes until it's all heated through. Serve with rice or anything else Indian.
Traditionally Bengali vegetable dishes aren't often cooked with garlic or onions, and so this cabbage recipe uses a simple combination of ginger and whole cumin seeds. Adding prawns is optional, and if you want to keep things vegetarian, peas are a good substitute. And in fact, having both in there is fine too.
Recipe (enough for 4 as part of a larger meal):
1 white cabbage, washed and shredded
Large thumb-sized piece of ginger, squashed to a paste
1 dried bay leaf
1 piece of cinnamon/cassia bark
1 green chilli
2 cardamon pods, split
1-2 tsp turmeric
2 tsp whole cumin seeds
1-2 tblsp sunflower (or other plain) oil
Around 150g cooked prawns and/or a couple of handfuls of peas
1 tsp salt, or enough to season
Heat up the oil in a large-ish flat bottomed pan (ideally) and when it's hot, but not smoking, throw in the bay leaf, cinnamon, cardamon. After a minute or two, add in the ginger and cumin seeds, and continue to stir over a medium heat for another couple of minutes. When the ginger is just starting to cook through and the seeds are slightly brown, put the cabbage in and stir everything really well. The residual water from washing the cabbage should provide enough liquid and steam to cook it. Once the cabbage has shrunk down a little, add the turmeric, salt, and green chilli (prick a couple of holes in it with a knife, so you get the flavour but not the heat), and stir well. Cook the cabbage for at least 15 minutes over a low heat with a lid on the pan- it should be completely tender and mildly yellow. Finally put in the prawns or the peas (defrosted if frozen), mix everything together and cook for a further 5 minutes until it's all heated through. Serve with rice or anything else Indian.
Labels:
almost vegetarian,
Bengali food,
cabbage,
Indian cooking,
pescatarian
Thursday, 2 May 2013
Cauliflower crust pizza
Pizza pre-cooking.
I am a big fan of the cauliflower. Roasted, puréed, in curries, covered in cheese sauce- it's basically very hard to go wrong. The one area I was very sceptical about however, was the cauliflower crust pizza. Much beloved of the low-carb movement, I just couldn't see how it this could possible work. I was imagining, at best, a sort of thin cauliflower cheese with added tomato sauce. And at worst, well something worse than that.
However when I spotted this recipe listed on the Guardian site a few weeks ago, it all sounded rather promising. And even more so when I saw the original blog post the recipe came from with its lovely photography.
Pizza post-cooking.
I followed all the steps required for cooking the cauliflower (using a food processor makes grating it a doddle but it's probably still feasible by hand), but did allow it to cool a bit before shaping into the bases. And the only minor substitution to the recipe was using a regular Philadelphia-style cream cheese rather than a goat's cheese. I was convinced at every stage that the mini-bases would fall apart, but they didn't at all. I let them fully cool while making a tomato sauce, and once this was done the bases were topped with a selection of cooked mushrooms, anchovies, red onion, and mozzarella or cheddar. They then went back in the oven until the cheese was golden and melted.
I was fully expecting the transfer from baking sheet to plate to result in pizza disintegration, but they even held up to being poked and prodded with a fish slice. The final pizza could be easily cut into segments, and tasted damn good (perhaps even more so as I did not have high expectations). This is not something you are going to mix up with a proper, thin-crust Italian pizza, but as the cauliflower base is very neutral the main flavours that come through are all the pizza toppings. And what's not to like about tomato sauce and melted cheese? So if you're looking for a slightly lighter pizza option, a gluten-free version, or just something a bit different, I would thoroughly recommend this recipe (which coincidently also reinforces my views on the usefulness of food blogs).
Labels:
cauliflower,
gluten-free,
pizza,
vegetarian
Monday, 15 April 2013
Bengali-style tuna fishcakes or macher chop
Several years ago I said in a blog post that I'd write about Bengali fishcakes or macher chop, but never quite got round to it. But as it's now Bengali new year, this seems an opportune moment to make good on that ancient promise.
These fishcakes would traditionally be served with dahl and rice, as a sort of 'first course', but a few are substantial enough to form the centre of a main meal. They are also pretty frugal, as they are made with tinned tuna and some other bits and bobs. You could of course use any firm fish, but for some reason it's always been tinned tuna in my household. Making the mix up in advance, and cooking it the next day, also adds to the convenience factor. This is also one of those recipes that can be adjusted to taste, so do change the amount of spices or chilli to suit.
Recipe (enough for around 12 depending on size):
1 medium potato, chopped up and boiled
2 tins (185g) of tuna chunks, drained
3 tblsp cooked frozen peas
1 medium onion
A large thumb-sized piece of ginger
4 medium cloves of garlic
2 whole green chillis
1 tblsp sultanas (optional)
2 tblsp salted peanuts, roughly chopped or 1 tblsp crunchy peanut butter
Around 3 tblsp chopped corriander leaves
2 tsp garam masala
2 tsp ground cumin
2 tsp ground coriander
1 tsp salt
1 egg, beaten (plus another if needed)
Fresh or dried breadcrumbs
Plain oil for shallow frying
Start by making a paste with the onion, garlic, ginger, and chilli. My trusty Kenwood mini chopper does this in a few seconds, but you could pound it all by hand if needed. Mash the cooked potatoes until they are relatively smooth, then add the onion paste, tuna, coriander leaves, peanuts, sultanas, spices, and egg. Finally put in the peas, and give everything a good mix so it's well combined. You should by now have a mixture that can be easily formed into small-ish fishcake shapes (either flat or tubular work). If the mixture is relatively wet, this surface moisture should be enough to get the breadcrumbs to stick to the fishcakes. But if that isn't happening, then lightly dip them in a bit of beaten egg before rolling in breadcrumbs. You can then put the fishcakes in the fridge (on a clingfilm-ed plate) until needed. This also helps them firm up, and not fall apart while frying, so I'd recommend you do this if possible.
Heat enough oil to generously cover the bottom of a flat plan, and when it's hot (but definitely not smoking) carefully slide in the fishcakes. Cook them in batches until they are golden brown, which should take a few minutes on each side. They are a bit delicate, so do exercise caution when turning them. Drain them on some kitchen roll, and prepare to tuck in. These fishcakes also re-heat really well, either in a non-stick pan, under the grill, or in the oven, so can easily be made in advance. And I'll be seeing the new year in with some shortly.
These fishcakes would traditionally be served with dahl and rice, as a sort of 'first course', but a few are substantial enough to form the centre of a main meal. They are also pretty frugal, as they are made with tinned tuna and some other bits and bobs. You could of course use any firm fish, but for some reason it's always been tinned tuna in my household. Making the mix up in advance, and cooking it the next day, also adds to the convenience factor. This is also one of those recipes that can be adjusted to taste, so do change the amount of spices or chilli to suit.
Recipe (enough for around 12 depending on size):
1 medium potato, chopped up and boiled
2 tins (185g) of tuna chunks, drained
3 tblsp cooked frozen peas
1 medium onion
A large thumb-sized piece of ginger
4 medium cloves of garlic
2 whole green chillis
1 tblsp sultanas (optional)
2 tblsp salted peanuts, roughly chopped or 1 tblsp crunchy peanut butter
Around 3 tblsp chopped corriander leaves
2 tsp garam masala
2 tsp ground cumin
2 tsp ground coriander
1 tsp salt
1 egg, beaten (plus another if needed)
Fresh or dried breadcrumbs
Plain oil for shallow frying
Start by making a paste with the onion, garlic, ginger, and chilli. My trusty Kenwood mini chopper does this in a few seconds, but you could pound it all by hand if needed. Mash the cooked potatoes until they are relatively smooth, then add the onion paste, tuna, coriander leaves, peanuts, sultanas, spices, and egg. Finally put in the peas, and give everything a good mix so it's well combined. You should by now have a mixture that can be easily formed into small-ish fishcake shapes (either flat or tubular work). If the mixture is relatively wet, this surface moisture should be enough to get the breadcrumbs to stick to the fishcakes. But if that isn't happening, then lightly dip them in a bit of beaten egg before rolling in breadcrumbs. You can then put the fishcakes in the fridge (on a clingfilm-ed plate) until needed. This also helps them firm up, and not fall apart while frying, so I'd recommend you do this if possible.
Heat enough oil to generously cover the bottom of a flat plan, and when it's hot (but definitely not smoking) carefully slide in the fishcakes. Cook them in batches until they are golden brown, which should take a few minutes on each side. They are a bit delicate, so do exercise caution when turning them. Drain them on some kitchen roll, and prepare to tuck in. These fishcakes also re-heat really well, either in a non-stick pan, under the grill, or in the oven, so can easily be made in advance. And I'll be seeing the new year in with some shortly.
Labels:
Bengali food,
chop,
fishcakes,
Indian cooking,
pescatarian,
tuna
Subscribe to:
Posts (Atom)